
If you look at old family snapshots from the 60s/70s/80s you’ll notice how colours have shifted and faded. Blacks are rarely jet-black and whites are almost yellow – some have a colour-cast across the whole image, others have one particular colour fading faster than any of the others. I love these photos!

1. 70s Family, 2. Family Photos, 1960s, 3. Late 1960s Early 1970s KUMPF Family Vintage Photos KUMPFS Pennsylvania Americana Christmas (35), 4. scan0034 david, 5. World Trade Center in the Mid-1970s, 6. vintage 1960s christmas dad photo
A simple way to emulate this effect and therefore give your modern-day digital photos a ‘vintage’ feel (sorry for over-using the whole ‘vintage’ thing, but I can’t think of a better word) is by using one simple but often over-looked tool in your Photoshop arsenal – the ‘Selective Color’ adjustment layer.
‘Selective Color’ allows you to alter the properties of the colours in your image one by one; creating subtle or startling effects depending on how far you push it. It was originally developed for people who needed to alter hi-res scans in preparation for CYMK printing – for example, you could adjust the amount of yellow ink in the greens of your image without affecting the yellow inks in the red areas.
Here’s how I use it:
With your layer selected create an adjustement layer – and choose ‘Selective Color’ – depending on your version of Photoshop you should see something like this…

The dropdown will show you all the primary colours as well as whites, neutrals and blacks. For each of these you can adjust the CMYK sliders. That’s all there is to it really – start sliding!
I start with the ‘Neutrals’, then ‘Blacks’ then ‘Whites’ then the all the other colours. When you look at older photos like those above you can see the blacks never look really black and often have a reddish or blueish tinge to them – this is easy to achieve using this tool.
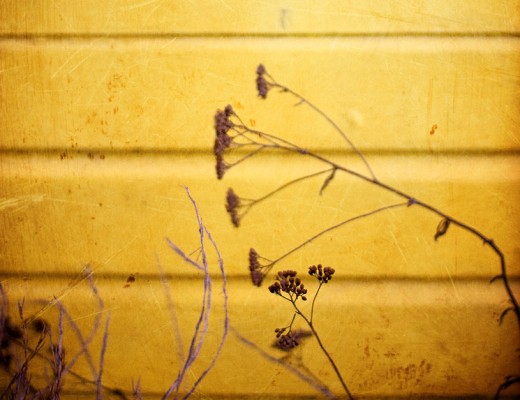
 Before
 After
After
This isn’t something I can really give you definitive settings for as every photo will be very different – it’s one of those tools you need to just use by eye and play around with.
What I would say though is that it’s a good to start with ‘Neutrals’ – there will be more ‘Neutral’ hues than any other (followed by ‘Blacks’, then ‘Whites’). Even if you had a photo of a field af grass, you’ll get a bigger effect changing the ‘neutrals’ as opposed to the ‘Greens’.
You can save your settings if you like, but I tend to treat each photo individually – no two are likely to be entirely the same. And of course this is an adjustment layer so you can go back and fiddle with the settings, turn them off or copy them at any time in the future. Great stuff!
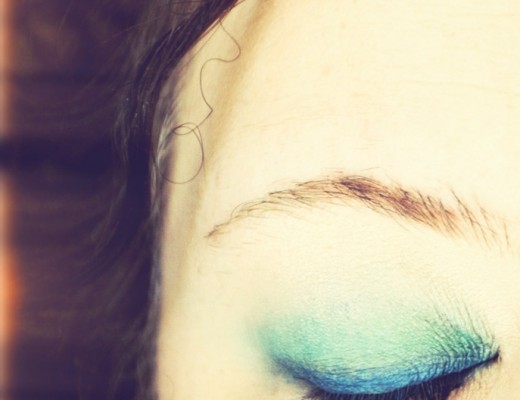
 before
 after
after
For such a quick and simple to use tool it’s pretty effective, don’t you think? Oh, and it’s also very useful for correcting colour shifts back to how they should be, of course!
11 Comments
Cass
9 March 2012 at 08:22Interesting. You’re right, I think I’ve been overlooking this tool! I usually stick to curves like my life depends on it and the reality is, I have no idea why. I know lots of people play with levels to adjust colour tones too. But I’ve never really understood what the difference between all these things is. I’m going to have to have a play with Selective Colours now though. Have a beautiful weekend (fingers crossed the weather holds – it’s bright and warm in Belgium today. I hope it’s the same where you are).
Angie
10 March 2012 at 21:32You always give me lots of ideas about what to write about – I think I might do something on ‘levels’ next!
Weekend is pretty awesome so far – yay, spring!!!
Becky Sue
11 March 2012 at 13:12Thank you so much for this! I recently discovered your blog and am really enjoying your tutorials. I’ve been looking for a tried and true way to adjust the blues in my sky shots and this works great!
Angie
11 March 2012 at 18:34That’s great news! So pleased it worked for you
Blanka
28 April 2012 at 21:35Hey Angie,
Thank you for these amazing tutorials! Would you by any chance know how to get this effect on images?
http://ilovewildfox.com/iloveyouwildfox/2012/4/24/violet-hume-is-a-wildfox-kid.html
Thank you
Angie
2 May 2012 at 23:32Those are lovely photos! Do you have Photoshop? You could try this Action (the one called ‘old enough to be your father’ looks the closest) http://www.angiemuldowney.com/2012/02/instagram-style-photoshop-actions/
Michael
26 September 2012 at 23:55You’re Great :):)


I’m impressed by your sense for Colors and Changes from the 80s. till now
But I think it’d be more helpful for me if you told me plz how can I achieve an effect like that in the cute photo up …with the Christmas Tree
There’s I think and additional step to make a photo like this It’s more dull or opaque .. I don’t know
Thanks and sorry for My not-very-good English
Angie
4 October 2012 at 22:49Your English is great, Michael! That’s an original 70s photo but you could probably get a similar effect by fiddling with the levels as well as the selective color adjustment layers.
vinyl wrap
20 June 2013 at 20:10My programmer is trying to convince me to
move to .net from PHP. I have always disliked the idea because of the costs.
But he’s tryiong none the less. I’ve been using WordPress on a variety of websites for
about a year and am worried about switching to another platform.
I have heard fantastic things about blogengine.net.
Is there a way I can import all my wordpress content
into it? Any kind of help would be greatly appreciated!
Charlotte Cooper
6 February 2014 at 13:04You could use the word Retro…
Thank you, these are perfect tips for what i’m trying to do.
Cheers
Road Runner
5 July 2015 at 00:14Nice tutorial!
Could you let me know what are the setting you use in Selective Colors (neutrals, black and white) on the image of the girl with the cupcakes? I am trying to replicate the same effect and is far aways from yours which is a really nice result.
Thanks 😉