
Firstly, let me just say I don’t think I have ever felt the need to turn one of my photographs into a painting before. I am perfectly happy that my photos look like photos and that my paintings look like an explosion in a paint factory.

That said, when I saw this technique on the Adobe forums I was intrigued by its simplicity and when I tried it I was like ‘OMG’ (yes, I really said that) – and best of all, it is so, so SUPER easy! There are instruction and downloads below for both Photoshop and Lightroom.
")
PHOTOSHOP METHOD – everything happens within Photoshop’s RAW plugin. This is what you do…
- This works best with images that aren’t too big, so start by downsizing an image to around 1000 pixels wide (or less) and saving as a JPG (this won’t work with very high-res images).
- Now, using Photoshop’s Bridge, select an image and open it in RAW by pressing Ctrl + R.
- Once you’re in the RAW dialogue box, slide the ‘Recovery’ all the way up to 100 and then slide the ‘Contrast’, ‘Vibrance’ and ‘Saturation’ levels so they’re all on 50.
Looks weird, doesn’t it? Don’t worry, here’s where the magic happens… - Click the third little square tab (the ‘detail’ tab; it has what looks like two little triangles on it). Turn the ‘Luminance’ up all the way to 100 and the ‘Luminance Detail’ to about 30.
- Ta da!
Here’s everything mentioned above packaged up into a convenient preset so you can load and go…
Painterly – camera raw preset

LIGHTROOM METHOD – this is what you do…
- This works best with images that aren’t too big, so start by downsizing an image to around 1000 pixels wide (or less) and saving as a JPG (this won’t work with very high-res images).
- Now, import this image into Lightroom and open the ‘Develop’ tab.
- In the ‘Basic’ section, slide the ‘Recovery’ all the way up to 100 and then slide the ‘Contrast’, ‘Vibrance’ and ‘Saturation’ levels so they’re all on 50.
Looks weird, doesn’t it? Don’t worry, here’s where the magic happens… - In the ‘Detail’ section turn the ‘Luminance’ up all the way to 100 and the ‘Detail’ to about 50.
- Ta da!
Here’s everything mentioned above packaged up into a convenient preset so you can load and go…
Painterly – Lightroom preset


You now have all the tools you need to trick family and fiends into believing you’re a bone-fide artiste without the need to spend years at art school or all those messy oils and pastels.
You’re welcome.
20 Comments
Life with Kaishon
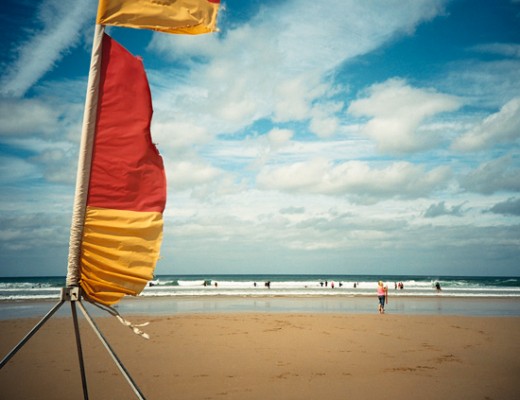
21 February 2012 at 20:48Fascinating. I just can’t get over your dressing rooms at the beach. I LOVE those : )
Angie
22 February 2012 at 10:29I never realised that those little beach-huts were such an exclusively British thing until i started taking photos of them
Kristine
22 December 2012 at 11:57We have them here in Oz too (Australia that is). They are super expensive to buy and very ‘la-di-da’
Thanks for the tutorial.
Angie
29 December 2012 at 22:47So pleased you like it
Joan Nova
6 March 2012 at 16:01I just found your blog today via a tweet. You have a new subscriber. Just tried this lightroom formula and I love it. Thank you for posting these and I look forward to more.
Angie
6 March 2012 at 20:21Hi Joan, and welcome! So pleased you liked this – I love doing them
Anne Hartman
23 July 2012 at 05:26I absolutely love your painterly tutorial but I downloaded the camera raw preset and now that I have it I’m not sure where to file it. Can you help me? Please!
Angie
24 July 2012 at 12:33Hi Anne, so pleased you like this

To install the preset: if you open Lightroom, make sure you’re in ‘develop’ mode, on the lft you’ll see ‘Presets’, right-click on the ‘user presets’ folder and find where your unzipped preset file is and import. Simple pimple
Sepp
18 August 2012 at 09:57Hello,
I haven’t tried yet, but i want to do this with very highres pictures to print. You say it’s not possible with highres. Why is that and is there another way then? Thanks,
Sepp
Angie
21 August 2012 at 21:37Hi Sepp – it’s all to do with the degree of alteration each of the actions makes to the image – i.e. a blur factor of 10 will have a really dramatic effect on a small 72dpi image but will hardly even register if the image is super-high-res. My only suggestion (and I haven’t tried this so I don’t know if it works) would be to apply the preset to the image – jpg it then reapply the preset and keep on doing it… that might work.
Kirsten
1 September 2012 at 19:34Hi, thanks for this!! I installed photoshop to try this and i am a bit stuck (i am a total novice). I can not for the life of me find the recovery slide you talk about. What am i doind wrong? I def opened the image in Raw. Thanks Kirsten
mifi
22 November 2012 at 19:05I love this effect! However I only managed to replicate it in LightRoom, in Photoshop there is something I’m missing at the “Luminance Detail” faze, as I can’t seam to find it, so the photo has no smooth effect. Is it something that I’m missing? Thanks you!
Angie
7 December 2012 at 00:08Hmm, not sure what’s happening there – what version of Photoshop do you have?
mifi
25 December 2012 at 15:47Adobe Photoshop CS4 Extended Version 11.0…i don’t know if this helps..
Dave
13 November 2013 at 00:06I have been trying out your approach and I notice that you put the sharpening down to maximise the “blur” effect, I wondered if you have tried it with high sharpening? Personally I prefer it … it kinda looks like an oil painting where as without sharpening it’s more like watercolour!
Ingrid
7 April 2014 at 15:06Hi,
Great post but I’m coming a few years too late with Lightroom 5 and in this version, there’s no “recovery” slide.
Have you done it with that version by any chance?
Thanks!
Jeff
22 April 2014 at 20:13How do you do this in Lightroom 5? There is no “recovery” button to slide?
Thanks!
Jeff
photography name ideas
8 November 2014 at 10:13Bear in mind if you’re however a novice the best digicam for you to get is the least expensive but not very low in technological innovation. Digital Photography doesn’t have to be rocket
science. 1) Ultra-compact- about the size of a credit card, and
fits easily into the front pocket of your jeans.
Chrystina
21 December 2015 at 04:27I’ think your examples look great but sadly the version I use does not have recovery. I have Lightroom CC right now. My old version Lightroom 3 did but can you suggest something compareable to recovery??
Chrystina
21 December 2015 at 04:27oh, sorry…..just saw others have already addressed that